Large Double Freestanding Pergola Installation

Overview

Connect Install delivered the installation of a large 8m x 5m double freestanding pergola system for a private residential client in Enniskerry, Co. Wicklow.

The project included glass on three sides, motorised blinds, LED integration and heater coordination. With difficult access, builder-prepared groundwork, existing brackets and drainage details around the structure, the installation required careful survey, planning and specialist execution on site.

Scope

Connect Install carried out the full specialist installation package, including pre-install survey, site readiness checks, access planning, pergola installation, glass handling, blind programming, cable routing for LEDs and heaters, and final closeout.

The system was a large double freestanding pergola, installed on client builder-prepared groundwork. The installation also had to coordinate with existing brackets, surrounding paving, drainage details and third-party heater components.

Challenge

The main challenge was the scale and complexity of the installation.

The pergola measured approximately 8m x 5m and included glass on three sides. All glass had to be moved manually from the front of the house to the installation area, through a restricted access route that included two sets of steps. No crane or hoist was used, so the glass installation required careful manpower planning, handling and control on site.

The project also required coordination with the client’s builders, who were completing the groundwork and paving around the pergola. Existing brackets had to be matched accurately, and the drainage around the structure had to align correctly with the finished installation.

In addition, the pergola included motorised blinds, LED lighting and heaters supplied by another supplier. Connect Install had to route cables, programme the blinds on site and personalise heater brackets so they could be installed cleanly onto the pergola structure.

Approach

Connect Install carried out a pre-install survey to check access, fixing conditions, builder-prepared groundwork and general site readiness before the installation started.

The structure was installed by a core crew of three to four installers over a two-week programme. For the glass installation, the team increased manpower to ten installers due to the size, weight and restricted access route.

During the works, the team coordinated the installation sequence around the existing brackets, drainage, paving, blinds, lighting and heater requirements. The structure was checked carefully during installation to ensure alignment, correct operation and a clean finished result.

Motorised blinds were programmed on site, cables were routed for the LED and heater elements, and custom bracket adjustments were made so the third-party heaters could be integrated into the pergola structure.

Result

The large freestanding pergola was installed successfully over a two-week programme.

The finished system included glass on three sides, motorised blinds, LED lighting and integrated heater brackets. Minor closeout items were resolved as part of the normal commissioning and handover process, and the client was happy with the final result.

The project demonstrates Connect Install’s ability to deliver complex specialist exterior installations where access, heavy component handling, survey-led planning, coordination with other trades and clean technical execution are all critical.

Key Proof Points

Production Case Study: Delivering Consistent Branding Across Multiple Signage Elements

Production Case Study: Delivering Consistent Branding Across Multiple Signage Elements

When a commercial signage project includes more than one sign type, consistency becomes one of the most important parts of the job. A brand can look strong on the main exterior sign, but if the window graphics, internal signs, directional signage, printed panels, and installation details do not match, the overall result can feel disconnected.

For this production case study, we are looking at how Connect Install manages a signage project where multiple branding elements need to work together as one complete system.

The goal was simple: produce and prepare a range of signage elements that looked consistent, matched the client’s brand standards, and were ready for a smooth installation on site.

Project Overview

The project involved producing several different signage elements for a commercial environment. Each item had a different purpose, material, finish, and installation requirement, but all of them had to feel like part of the same brand.

The production package included:

This type of project requires more than simply printing files. It needs artwork checking, colour control, material planning, production scheduling, finishing, quality control, packing, and clear communication between the production and installation teams.

The Challenge: Keeping the Brand Consistent Across Different Sign Types

Brand consistency becomes more difficult when the same visual identity has to be applied across different materials and surfaces.

A logo printed on vinyl can look slightly different from the same logo on a rigid panel. Colours can shift depending on the media, laminate, lighting conditions, and surface finish. Text size, spacing, and positioning can also feel inconsistent if each item is produced separately without a controlled process.

For this project, the key challenge was making sure every signage element looked connected, even though each piece had a different function.

The main areas we had to control were:

Without proper production control, small differences can quickly become visible once everything is installed together.

Artwork and Prepress Checks

Before production started, all artwork was checked by our production team. This stage is important because it helps catch issues before they reach print, cutting, or installation.

We checked file sizes, scale, bleed, cut lines, logo placement, colour setup, image resolution, and production notes. Any artwork that needed adjustment was reviewed before moving forward.

For multi-element signage projects, prepress is one of the most important stages. It ensures that every item is produced from the same approved brand direction, rather than being treated as separate one-off pieces.

This helps reduce errors, avoid reprints, and keep the finished signage aligned with the client’s expectations.

Material Selection and Production Planning

Different signage elements need different materials. Some graphics need to be durable and easy to clean. Some signs need to be rigid and stable. Some window graphics need to allow light through while still carrying the brand clearly.

For this project, materials were selected based on:

Once the materials were confirmed, the production schedule was planned so that related elements could be produced and checked together. This allowed us to compare colours, finishes, and details before the full package moved to installation.

Colour and Finish Control

Colour consistency is one of the biggest factors in professional signage production. A brand colour needs to look right across different items, especially when those items will be seen in the same space.

During production, we checked printed output against the approved artwork and brand requirements. Where required, test prints and visual checks were used to make sure the final output was suitable before full production continued.

Finish also plays a major role. Gloss, matt, clear, frosted, and laminated surfaces can all affect how a colour appears. Choosing the correct finish helps the full signage package feel intentional and consistent.

The aim was not only to produce each item correctly, but to make sure the full set worked together visually.

Printing, Cutting, Finishing, and Quality Control

After artwork and material approval, the signage elements moved through production.

This included printing, laminating where required, cutting, trimming, mounting, and preparing each item for installation. Each stage was checked to make sure the finished pieces matched the production requirements.

Our quality control process focused on:

For projects with multiple elements, quality control is not just about checking one sign at a time. It is about checking the full package as a complete branded system.

Preparing for Installation

Good production does not stop when the signage is printed. The final stage is making sure the installation team receives everything clearly packed, labelled, and ready for site.

For this project, each signage element was prepared with clear references so the installation team could identify what needed to go where. This helps reduce confusion on site and supports a faster, cleaner installation process.

Site-ready preparation included:

This step is especially important on commercial projects where timing, access, and coordination matter.

The Result

The finished signage package delivered a consistent brand appearance across multiple signage elements. Each item had its own function, but the full result felt unified, professional, and aligned with the client’s visual identity.

By managing the production process in a controlled way, Connect Install helped reduce risk, improve consistency, and support a smoother installation.

The result was a complete signage package that was ready for site and built around the same brand standard from start to finish.

Why This Matters for Commercial Signage Projects

For commercial and industrial signage projects, consistency is not a small detail. It affects how customers, staff, visitors, and contractors experience the space.

When signage is consistent, the brand feels stronger. Information is easier to follow. The environment looks more professional. The installation also becomes more efficient because every element has been properly checked and prepared before reaching site.

This is why Connect Install focuses on the full process, not just the final product.

From artwork checks and production planning to finishing, packing, and installation support, every stage affects the quality of the finished result.

Conclusion

Delivering consistent branding across multiple signage elements requires planning, technical production knowledge, and attention to detail.

Every material, colour, finish, cut line, and installation reference matters.

At Connect Install, our production process is built to support commercial signage projects where quality, consistency, and reliable delivery are essential. By managing the details before the signage reaches site, we help create a smoother installation process and a stronger final result for the client.

How to Plan a Multi-Site Rollout in Ireland: A Practical Guide for Project and Retail Teams

Multi-site rollouts fail, or run over budget and programme, when scope, surveys, production, and delivery are not properly connected from the start. Getting these elements aligned before deployment begins is the most reliable way to deliver a consistent result across multiple locations, on time and without the coordination problems that turn rollouts into damage limitation exercises.

What Makes Multi-Site Rollouts Difficult to Deliver?

Most rollout problems do not start on install day. They start earlier, when the programme moves forward without enough clarity on the real conditions across the sites involved.

The issues that cause rollouts to stall or overrun tend to cluster around the same recurring failures: inconsistent site information that only surfaces during deployment; scope that is clear in the master plan but unclear at individual site level; access windows that were agreed on paper but don't reflect how each location actually operates; production that was planned independently of the deployment schedule; and closeout processes that were not defined until installation was already finished.

The more sites involved, the more these small problems multiply. A single site with an access issue is a minor disruption. The same issue across twenty sites is a serious programme failure.

How Should a Multi-Site Rollout Be Structured?

A multi-site rollout needs more than a list of locations and a target date. It needs a structure, one that supports consistent delivery across every site, absorbs the variation that will inevitably appear, and maintains clear accountability throughout the programme.

At the planning stage, teams should be clear on:

The stronger this structure is at the outset, the easier the rollout becomes to manage when site-level complications arise, as they always do.

Why Do Surveys Matter Before a Rollout Deployment?

A rollout should not be planned purely from assumptions, drawings, or one standard site used as a template for all locations, particularly if real conditions vary between them.

Surveys confirm what is actually on the ground: dimensions, fixing conditions, access routes, live trading or operational constraints, substrate conditions, and what is genuinely repeatable versus what will need a site-specific approach. For signage and graphics rollouts, they also confirm visibility lines, existing branding to be removed, and whether the proposed install method will work on the actual wall, glazing, or substrate at each location.

We surveyed 28 sites before committing to the rollout programme. At 11 of them, the survey changed the specification, different fixing method, different film product, or a sequencing adjustment we hadn't anticipated from the drawings. Those changes were cheap to make in planning. They would have been expensive to manage on install day. — Connect Install delivery team, retail signage rollout, Republic of Ireland, 2025

Survey quality has a direct effect on delivery quality. The more accurately each site is scoped before deployment begins, the fewer surprises appear during installation, and the closer the actual programme tracks to the planned one.

How Do You Separate Standard Scope from Site-Specific Variation?

One of the most important, and most frequently underestimated, parts of rollout planning is drawing a clear line between what is identical across all sites and what will vary.

Project teams should identify early on what is genuinely standardised, same dimensions, same fixing method, same product, and what will need a site-specific approach. They should also define how much tolerance exists within the standard: if a wall measurement is off by 50mm, does that require a design change or just a different trim approach?

And they should agree in advance how variations will be handled commercially and operationally when site conditions differ from the brief. The rollout programmes that run smoothest are the ones where the variation process is agreed before the first site is installed, not negotiated site by site as the programme unfolds.

How Do You Align Production With Rollout Delivery?

In multi-site work, production should not be running independently of the deployment schedule. When production and delivery planning are disconnected, when material is produced to a standard lead time rather than a site-specific sequencing plan, projects tend to suffer from waste, rework, site confusion, and avoidable delays.

Production needs to be aligned to confirmed scope, the site sequencing plan, the deployment windows at each location, the packing and kitting requirements for each site, and any location-specific needs that affect how materials should be prepared or labelled.

The aim is for materials to arrive at each site install-ready, correctly kitted, correctly labelled, in the right order for the access window available. This is particularly important in rollout programmes with multiple product types, phased deployment across regions, or sites with different installation sequences.

How Do You Plan Site Access Across Multiple Locations?

Site access is often where rollout plans hold or fall apart. The access window at a live retail unit during trading hours is not the same as the access window for a corporate workplace or a healthcare environment, and across twenty or thirty sites, these differences add up significantly.

Before deployment is scheduled, project teams should confirm for each location:

For live retail environments specifically, the ability to work overnight or over weekends is often critical. Programmes that rely on daytime access to trading stores routinely run into disruption issues that could have been avoided with a more realistic access plan built from the start.

What Does a Realistic Rollout Programme Look Like?

A rollout programme should be built around real delivery conditions, not around a target date working backwards with optimistic assumptions.

A realistic programme accounts for:

Compressed timelines are sometimes necessary, client deadlines, brand launches, and lease events don't always allow for ideal planning time. But a compressed programme still needs structure. The difference is not whether the timeline is tight; it's whether the structure underneath it is sound.

How Should Closeout Be Managed Across a Rollout Programme?

Closeout is not an afterthought. On rollout programmes where completion data, sign-off, or reporting matter, and most commercial rollouts involve at least one of these, the closeout format needs to be defined before the first site is installed.

That means agreeing in advance:

Defining this early keeps reporting consistent across the programme, so the closeout pack for site one looks the same as the closeout pack for site thirty. And it ensures the delivery team knows from the start what evidence needs to be captured on site, rather than trying to reconstruct it after the fact.

What Does Good Rollout Delivery Look Like in Practice?

Step 1
Define the rollout structure. Agree scope, site count, sequencing approach, variation handling, access parameters, production alignment, and closeout format before surveys begin. Not as a formality, as the operating framework the whole programme runs within.

Step 2
Survey before you plan. Visit each site and confirm real conditions, dimensions, substrates, access, operational constraints, and what varies from the standard. Use survey findings to update the scope before production begins, not after materials have been ordered.

Step 3
Align production to the deployment plan. Build the production schedule around the confirmed deployment sequence, site by site, access window by access window. Kit and label materials per location. Don't produce to a standard lead time and then adapt on site.

Step 4
Plan access properly. Confirm access conditions at each location before scheduling. Overnight and weekend availability, induction requirements, delivery constraints, and sequencing with other contractors. Build the schedule around real access, not assumed access.

Step 5
Deploy with a consistent crew and communication model. Use a delivery team that understands the programme, not a different crew at every location. Maintain consistent communication with site contacts throughout deployment so issues are surfaced and resolved quickly.

Step 6
Close out properly at every site. Collect the required completion evidence at each location, photos, sign-off, snag confirmation. Consistent site-level closeout makes programme-level reporting straightforward.

Frequently Asked Questions

What makes multi-site rollouts difficult to deliver?

Most rollout problems start before install day, when the programme moves forward without enough clarity on real site conditions. Typical issues include inconsistent site information, unclear scope at individual site level, access windows that don't reflect how locations actually operate, production not aligned with deployment, and closeout processes not defined until installation is already finished. The more sites involved, the more these issues multiply.

Why do surveys matter for multi-site rollout projects?

Surveys confirm the real conditions at each location, dimensions, fixing conditions, access routes, operational constraints, and what is genuinely repeatable versus what varies by site. Survey quality has a direct effect on delivery quality: the more accurately the rollout is scoped per site before deployment, the fewer surprises appear during installation.

How should production be aligned with rollout delivery?

Production should be planned around confirmed scope, site sequencing, deployment windows, installation method, kitting requirements, and any site-specific needs. When production runs independently of the deployment schedule, projects tend to suffer from waste, rework, site confusion, and avoidable delays.

What should a realistic rollout programme include?

A realistic rollout programme accounts for survey completion, design freeze or content sign-off, production lead times, kitting and distribution, travel and geography, crew allocation, access windows per site, dependencies between sites, contingency for issues or rework, and reporting and closeout time.

How should closeout be managed on a multi-site rollout?

Closeout should be designed into the delivery model from the beginning. Define what completion looks like before the first site is installed: site completion records, sign-off format, photo reporting requirements, snag tracking, and who has sign-off authority. Consistent site-level closeout makes programme-level reporting straightforward.

Who delivers multi-site rollouts in Ireland?

Connect Install delivers multi-site rollout projects across Ireland, including the Republic of Ireland and Northern Ireland. Our model covers surveys, production, signage and graphics installation, fit-out and refresh support, rollout scheduling, and closeout reporting, from scope through sign-off.

Planning a rollout or refresh programme in Ireland?

We can help review the rollout structure, support clearer planning, and deliver the programme in a more controlled and joined-up way, from surveys through installation and closeout.

Talk to us about your rollout.

Commercial Window Film: What to Specify, Where It Works, and How to Plan It Right

Commercial window film is a retrofit glazing solution applied directly to existing glass, improving privacy, reducing UV exposure, controlling solar heat gain, enhancing appearance, or meeting compliance requirements without replacing the glass itself. Specified correctly and installed on the right surfaces, it is one of the most practical, lowest-disruption improvements available to FM teams, property managers, and fit-out projects.

What Is Commercial Window Film and What Can It Do?

Commercial window film is a thin, adhesive-backed film applied to the surface of existing glass, internal or external, to change how that glass performs, looks, or behaves. It does not replace the glass. It works with the glass already in place.

Depending on the film type and specification, it can reduce visibility from outside or between spaces, cut UV transmission, manage solar heat gain and glare, improve glass safety performance, add a branded or decorative finish, or meet manifestation compliance requirements. A single installation can address more than one of these needs simultaneously, depending on the product selected.

For FM teams, property managers, and fit-out contractors, the appeal is straightforward: it delivers a meaningful improvement to existing glazing without the cost, programme disruption, or waste associated with full glass replacement.

What Types of Commercial Window Film Are Available?

Different project outcomes require different film types. Getting the specification right means understanding what the glazing actually needs to do. The main types used in commercial environments are:

Privacy film is used where visibility needs to be reduced, into or through glazed areas. Common in offices, meeting rooms, healthcare settings, reception areas, and anywhere visual separation is needed without a physical barrier.

UV protection film reduces UV transmission through glass, typically by 98–99% in high-performance grades. It helps limit the fading of interiors, furnishings, flooring, displays, and materials affected by sunlight over time.

Solar control and heat reduction film reduces solar heat gain and glare in spaces with large glazed areas or strong direct sunlight. It improves occupant comfort without the need for external shading, blinds, or glazing replacement.

Security film improves glass retention in the event of impact or breakage. It is relevant in settings where glass vulnerability, breakage risk, or added resilience is part of the project brief, including retail, public buildings, and ground-floor commercial environments.

Reflective and mirror film creates a one-way effect, providing daytime privacy from outside while maintaining views from within. It is also used for solar performance and as a visual finish in feature glazing.

Frosted and manifestation film is used for privacy screening, compliance with glazing manifestation requirements, and branded or decorative treatments. It is common in offices, healthcare, retail, and education environments.

Most commercial projects have a primary objective, privacy, UV, solar control, and the specification is built around that. Some projects combine film types across different glazing areas within the same building.

Where Does Commercial Window Film Work Best?

Window film is particularly well suited to live commercial environments where replacement, heavy building works, or extended disruption are not practical. The installation process is clean, quiet, and can typically be completed while the building is occupied.

Typical settings where it works well include:

It also fits well within refurbishment and fit-out programmes where glazing treatment is one element of a wider project, sitting alongside signage, graphics, or surface transformation works.

What Should Project Teams Consider Before Specifying?

Window film should not be treated as a one-line add-on. The right result depends on understanding the actual site conditions. Getting the specification wrong, or applying the wrong film type to the wrong glazing, can produce a result that fails or underperforms.

Before specifying, project teams should be clear on:

An important note on glazing type: some high-performance solar control films are not suitable for use on certain double-glazed units because of the thermal stress they can introduce. Applying the wrong film to sealed double-glazed units can cause seal failure or glass breakage. A survey-led approach confirms glazing type before specification is finalised.

Why Does a Survey-Led Approach Matter?

Window film projects often look simple from a distance. In practice, site conditions matter significantly, and a survey carried out before specification is confirmed prevents problems that are expensive and disruptive to fix after the film has been ordered and the crew is on site.

A proper survey confirms:

The survey also produces a written scope. That scope is what the installation is delivered against, so there are no assumptions on site, and no surprises when the work is completed.

What Does the Installation Process Look Like?

Every Connect Install window film project follows the same structured process, from initial review through to sign-off.

Step 1
Initial Scope Discussion. We start with a conversation about the project objective, what the glazing needs to do, where the spaces are, what constraints exist, and whether a film-only solution or a wider package is needed.

Step 2
Site Survey and Glazing Assessment. We visit the site to assess every glazing area in scope, confirming glazing type, dimensions, access conditions, edge details, and installation requirements. For solar control or UV film on double-glazed units, glazing type confirmation is critical before any material is specified.

Step 3
Film Specification and Samples. We recommend the appropriate film type and grade for each glazed area based on the survey findings and project objectives. Physical samples are provided for approval before material is ordered, particularly for decorative, frosted, or reflective finishes.

Step 4
Installation. Film is applied to clean, prepared glazing surfaces using professional wet or dry application technique depending on the product and environment. Clean edge finishing, seam management, and final inspection are all part of the standard process.

Step 5
Closeout and Sign-Off. On completion, a closeout pack is issued with photographic documentation, a completion record, and confirmation of all areas installed. For FM teams reporting to building owners or asset managers, this provides the evidence trail needed for records.

When Is Commercial Window Film the Right Solution?

Window film is often the right choice when the space needs to stay operational during works, the client wants a retrofit improvement rather than replacement, the project is time-constrained, or the glazing issue is primarily about privacy, UV, glare, heat, or appearance.

It is especially useful where FM and property teams are trying to solve a specific glazing problem, a meeting room with privacy issues, a south-facing office with an overheating problem, a reception area where branded or frosted glass is needed, without turning the job into a larger glazing replacement project.

It is not the right solution where there is a structural glazing failure, active moisture in the glazing unit, or where the building requires a technical performance upgrade that only a specific glass specification can deliver. When we survey a project and reach that conclusion, we say so.

Frequently Asked Questions

What is commercial window film?

Commercial window film is a retrofit glazing solution applied directly to existing glass. It can improve privacy, reduce UV exposure, control solar heat gain, enhance appearance, or meet compliance requirements, without replacing the glass itself. It is available in multiple types including privacy, UV protection, solar control, security, reflective, decorative, and frosted manifestation film.

What types of window film are available for commercial buildings?

The main types are privacy film, UV protection film, solar control and heat reduction film, security film, reflective or mirror film, decorative film, and frosted or manifestation film. Most commercial projects use one primary type, sometimes combined across different glazing areas within the same building.

How disruptive is commercial window film installation?

Commercial window film is one of the lowest-disruption glazing improvements available. There is no glass removal, no heavy plant, and no extended contractor programme. Most installations can be completed during normal working hours with the building fully occupied. For environments where any daytime disruption is a concern, out-of-hours installation is available.

Does commercial window film require a site survey?

A site survey is strongly recommended before specification is confirmed. Surveys confirm glazing dimensions, glazing type, access conditions, edge details, and installation sequencing. This matters particularly for solar control and UV films where glazing type affects which products can be used safely.

Where does commercial window film work best?

Commercial window film works well in offices, retail environments, healthcare settings, education buildings, hospitality spaces, reception areas, and meeting rooms. It is particularly effective in live environments where replacement, heavy building works, or extended disruption are not practical options.

Who installs commercial window film in Ireland?

Connect Install provides commercial window film supply and installation across Ireland, including the Republic of Ireland and Northern Ireland. Every project begins with a survey-led scoping process before installation is confirmed, so the right film is specified for the right glazing and environment.

Considering window film for a commercial project?

Our team surveys, specifies, and installs commercial window film across Ireland, with a survey-led approach, live-environment capability, and full closeout documentation on completion.

Talk to us about your project or request a site survey.

What Is DI-NOC? A Practical Guide for FM and Property Teams in Ireland

DI-NOC is a 3M architectural surface film applied directly over existing doors, lift interiors, reception counters, joinery, and wall panels to transform their appearance, without removing or replacing the underlying surface. For FM and property teams, it offers a route to low-disruption visual improvement at 30–60% of the cost of full replacement, in a fraction of the time, with the building fully operational throughout.

What Exactly Is DI-NOC and How Does It Work?

DI-NOC is a self-adhesive architectural surface film manufactured by 3M. It is designed to be applied directly over existing hard surfaces, changing or upgrading their appearance without removing and replacing the original substrate.

The film consists of a high-grade cast PVC layer, embossed or printed to replicate the appearance and texture of materials including wood grain, metal, stone, leather, fabric, and solid colour, bonded to a pressure-sensitive adhesive backing. When applied by a trained installer to a correctly prepared surface, DI-NOC is virtually indistinguishable from the material it replicates, to the eye and, in many cases, to the touch.

It is not a vinyl wrap in the promotional sense. It is an architectural material manufactured and tested for permanent installation in commercial environments, with a rated service life of 7–12 years in interior applications. 3M produces it in over 1,000 finishes across more than 20 design categories.

Why Do FM and Property Teams Use DI-NOC?

For facilities managers and property teams, refurbishment decisions are about more than appearance. They also involve disruption, downtime, programme impact, cost, and whether the building can remain operational while the work is carried out.

Full surface replacement, for a row of internal doors, a lift interior, a reception counter, typically means closing areas, removing existing surfaces, managing construction waste, and coordinating an extended trades programme. For a building that is occupied and operational, that has real cost and real disruption attached to it.

DI-NOC removes most of those constraints. The existing surface stays in place. The film is applied over it. A full lift interior, walls, panels, door faces, can be completed in a single day. A row of twenty internal doors can be transformed over a weekend without disrupting occupants. There is no demolition, no heavy waste, and no extended building programme.

We had been looking at the lift interior for eighteen months but the disruption and cost of replacement made it feel like a much bigger project than it needed to be. DI-NOC was a different conversation entirely, the team completed three lift interiors in a single weekend and we didn't receive a single complaint from the building's tenants. - Property manager, multi-tenanted commercial office, Dublin, 2025

The other driver is flexibility. DI-NOC is removable and replaceable, which matters in leasehold environments, buildings with changing tenants, or portfolios where branding or finish standards may evolve over time. A surface transformed with DI-NOC can be restored or re-specified without the cost and disruption of replacement works.

Where Does DI-NOC Work Best?

DI-NOC is particularly useful in live commercial environments where spaces need to stay operational, or where disruption needs to be kept to an absolute minimum.

Common settings include:

It also fits well within wider fit-out or refresh programmes, sitting alongside signage, graphics, or other interior installation works, so that visual improvements across multiple surface types can be coordinated and delivered as a single programme.

What Should Be Considered Before Specifying DI-NOC?

DI-NOC should not be treated as a purely visual decision. The success of the finish depends heavily on real surface conditions and application details — and getting these wrong, or applying DI-NOC to an unsuitable substrate, will produce a result that fails prematurely.

Before specifying, project teams should consider:

DI-NOC is not a cosmetic fix for a surface with structural or substrate problems. Active moisture, damaged MDF, or surfaces with adhesion issues will cause the film to fail regardless of application quality. A survey-led review before specification confirms substrate suitability, identifies required preparation, and gives the project team a realistic picture of what is involved.

How Does DI-NOC Compare to Painting or Full Replacement?

DI-NOC delivers a premium material finish, wood grain, metal, stone, that repainting cannot replicate, at 30–60% of the cost of full surface replacement. It can be completed in hours or days rather than weeks.

Compared to painting: DI-NOC is more expensive but delivers a textured, realistic material finish rather than a flat painted surface. It has a longer service life, 7–12 years in commercial interiors versus 3–5 years before repainting is typically needed. It is also removable, which paint is not.

Compared to full replacement: DI-NOC costs significantly less and takes a fraction of the time. The trade-off is a shorter service life, full replacement typically lasts 15–25 years, and DI-NOC is a cosmetic finish, not a structural one. Where the surface itself has failed, replacement is the right answer.

For most FM and property decisions, DI-NOC sits in a clear position: it delivers a result much closer to full replacement quality than repainting, at a fraction of the cost and disruption. The right choice depends on the condition of the surface, the finish standard required, and the operational constraints of the building.

Why Does a Survey-Led Approach Matter for DI-NOC Projects?

Architectural finishes can look straightforward in concept. In practice, surface condition, substrate suitability, edge details, and access constraints all affect the result, and problems discovered on site are far more expensive to manage than problems identified at survey stage.

A survey-led approach confirms:

The survey also produces a written scope — what is included, what preparation is required, what is excluded, and what the programme looks like. That scope is what the installation is delivered against. There are no surprises on site, and the client has a clear basis for reviewing and approving the work before it begins.

What Does the DI-NOC Installation Process Look Like?

Step 1
Initial discussion and scope review. We start with a conversation about the project, what surfaces are being considered, what the objective is, and whether DI-NOC is likely to be the right solution before any further time is invested.

Step 2
Site survey and surface assessment. We visit the site to assess every surface in scope. Substrate condition, edge details, access constraints, traffic levels, and environmental factors are all reviewed and documented. The survey produces a written scope with material specification, preparation requirements, programme, and installation assumptions.

Step 3
Finish selection and sample approval. We provide physical samples of the recommended DI-NOC finishes for client review and approval. For large projects or complex environments, a test panel on a non-critical surface confirms the finish under the building's actual lighting conditions before material is ordered.

Step 4
Surface preparation. The most critical stage. All surfaces are thoroughly cleaned, degreased, and any imperfections addressed before application. For high-traffic surfaces, a primer coat may be applied to ensure long-term adhesion. Inadequate preparation is the primary cause of premature film failure, this step is not abbreviated.

Step 5
Installation. DI-NOC is applied using professional wet or dry technique depending on the surface and product grade. Seams are managed to be invisible under normal viewing conditions. Edge finishing, corner management, and detail work are all included as part of the standard installation process.

Step 6
Closeout and sign-off. On completion, a closeout pack is issued: photographic documentation of the finished installation, a snag checklist confirming all items are closed, and a handover record. For FM managers reporting to building owners or asset managers, this provides a clear evidence trail for records.

Is DI-NOC Right for Every Surface or Environment?

DI-NOC is the right solution for the majority of commercial interior surface upgrade requirements in live environments. It is not the right solution for everything.

It is not suitable for exterior applications in standard grades, surfaces with active moisture or structural damage, heavily textured or porous surfaces without a levelling substrate, or situations where the underlying surface needs structural repair rather than cosmetic improvement.

If we survey a surface and conclude that DI-NOC is not the right approach, because of substrate condition, environmental factors, or the nature of what the client actually needs, we say so. We would rather give a clear, honest answer at survey stage than deliver a project that will not perform to the expected standard.

Frequently Asked Questions

What is DI-NOC?

DI-NOC is a self-adhesive architectural surface film manufactured by 3M. It is applied directly over existing surfaces, doors, lift interiors, reception counters, joinery, wall panels, to completely change or upgrade their appearance without removing or replacing the original substrate. Available in over 1,000 finishes including wood grain, metal, stone, solid colour, and textile textures.

Why do FM and property teams use DI-NOC?

FM and property teams use DI-NOC because it allows surface upgrades to be carried out with significantly less disruption than full replacement. There is no demolition, no removal of existing surfaces, no heavy waste, and no extended contractor programme. In live commercial buildings, DI-NOC can transform a surface in hours or days where replacement would take weeks, with the building fully operational throughout.

What surfaces can DI-NOC be applied to?

DI-NOC can be applied to most flat or gently curved hard interior surfaces that are structurally sound, clean, and dry. Common applications include doors and door frames, lift interior walls and panels, reception desks and counters, joinery and built-in cabinetry, wall panels, and columns. A site survey before installation confirms suitability, required preparation, and any edge or detail conditions that affect the result.

What should be considered before specifying DI-NOC?

Consider: the condition of the existing substrate; the surface type and any preparation required; edge details, junctions, and obstacles; traffic levels and usage; access restrictions and timing; environmental conditions; finish expectations; and whether the work sits within a wider fit-out or refurbishment programme. A survey-led review before specification is confirmed is the most reliable way to avoid surprises at installation.

How does DI-NOC compare to painting or full replacement?

DI-NOC delivers a premium material finish, wood grain, metal, stone, that repainting cannot replicate, at 30–60% of the cost of full surface replacement. It is removable and replaceable, which paint and replacement are not. The trade-off is a shorter service life than full replacement, typically 7–12 years in commercial interiors, and it is a cosmetic finish, not a structural one.

Is DI-NOC suitable for live commercial environments?

Yes. DI-NOC is particularly well suited to live commercial environments. Installation generates no demolition waste, no significant noise, and no dust or fumes. Most installations can be completed during normal working hours with the building fully occupied. For environments where any daytime disruption is a concern, Connect Install offers out-of-hours installation at night or over weekends.

Considering DI-NOC for a commercial building?

Our team surveys, specifies, and installs DI-NOC across commercial properties throughout Ireland, with survey-led scoping, minimal disruption, and a full photographic closeout pack on completion.

Discuss your project or request a site survey: new.web.connectinstall.ie/discuss-your-project
Aldi Chillers Rollout

Project overview

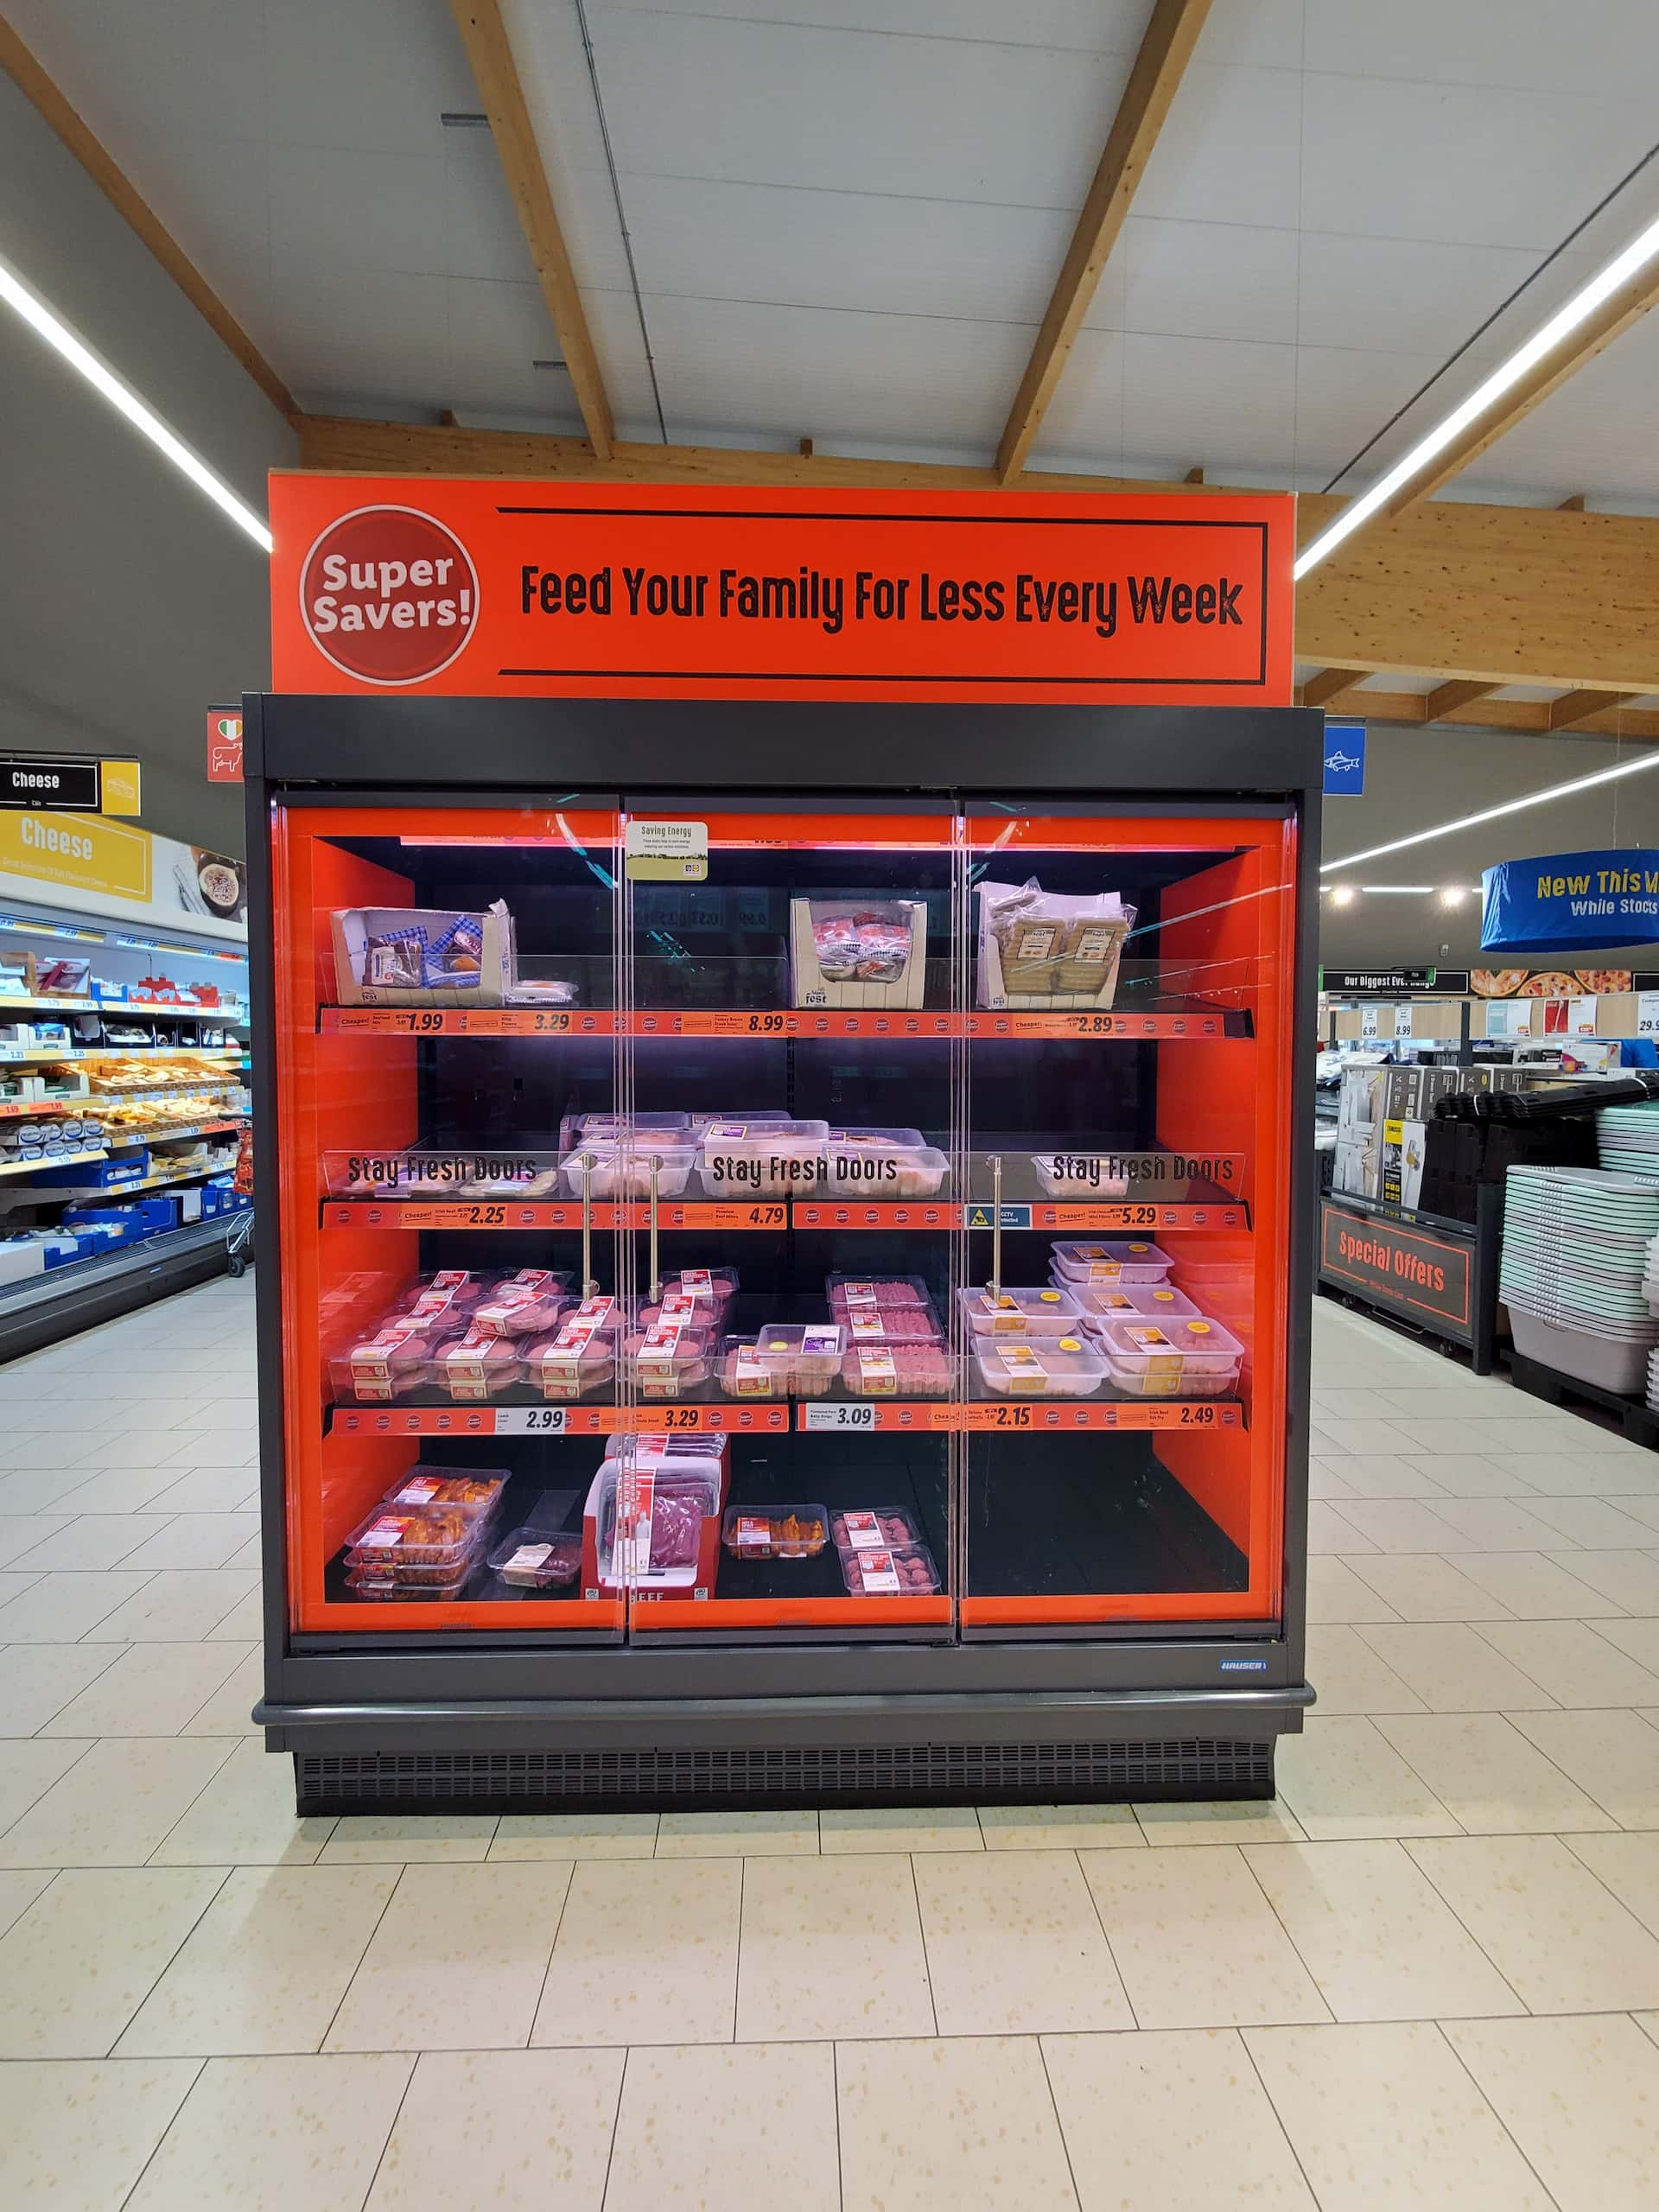
Connect Install delivered a nationwide seasonal promotional graphics rollout across more than 100 Aldi stores in Ireland over a 1-2 month period. The project involved replacing and updating graphics across live retail environments, with works carried out during trading hours and with minimal disruption to store operations.

Client / project context

This was a multi-site rollout in the grocery retail sector, delivered as part of a wider repeat programme. The work was time-sensitive, with multiple locations needing to be completed each day, and consistency across all sites was important to the success of the campaign.

Scope delivered

Connect Install delivered:

Key delivery challenges

The main challenge was delivering at scale across live trading stores during normal operating hours. The programme required disciplined coordination, multiple site visits per day, and the ability to manage changes during delivery without affecting pace, finish quality, or overall rollout consistency.

How Connect Install approached it

Scope and survey information were provided at the outset, allowing the team to focus on organised rollout delivery. Production and installation were coordinated closely, operations managed the programme day to day, and installers delivered efficiently across the live store estate. Changes during the rollout were handled through the operations team, and closeout was managed in a structured way to keep reporting clear and the programme moving.

Outcome

The rollout was completed cleanly and on time across more than 100 locations, with strong consistency from site to site and minimal disruption to trading stores. The works were delivered within the required access windows, reporting was completed properly, and the programme led to repeat work.

Proof points

Why this case study matters

This project demonstrates Connect Install’s ability to deliver repeatable, time-sensitive, multi-site rollout work across live retail environments with clean execution, strong coordination, and reliable closeout.

Dundrum Shopping Centre Refresh Works

Project overview

Connect Install delivered a fast-paced visual refresh across a live shopping centre environment in Dundrum, Dublin, covering illuminated signs, specialist wall graphics, and a range of branded visual elements across three floors. The works formed part of a wider refurbishment programme and had to be completed to a high standard within tight deadlines and restricted working conditions.

Client / project context

This project was delivered in a retail / shopping centre environment for Focus Branding, supporting a wider building refresh. Although it was a single-site project, it involved multiple work areas across three floors in a live operational setting, with night works required to reduce disruption and meet programme demands.

Scope delivered

Connect Install delivered:

The delivered scope included approximately:

Key delivery challenges

The project had to be delivered within a live commercial environment under tight deadlines, with restricted access and night working requirements. Some of the wall-wrapping elements were technically demanding, and the programme also required coordination with joinery works and other parallel activity on site.

How Connect Install approached it

Scope verification and survey support were led by Focus Branding, with Connect Install coordinating closely on programme planning and delivery. Production and installation were aligned between suppliers and the site team, and the works were organised to fit the available access windows while maintaining pace and finish quality across all three floors. Daily reporting supported clear visibility and controlled closeout throughout the programme.

Outcome

The refresh works were completed on time, within the available access windows, and to a high standard across the full site. Despite the live environment, night working, and coordination demands, the project was delivered cleanly with minimal disruption and strong client feedback. The job also led to repeat work.

Proof points

Why this case study matters

This project shows Connect Install’s ability to deliver high-quality branded refresh works in a live commercial environment where access is restricted, finish standards matter, and different workstreams need to be coordinated tightly to hit programme deadlines.

HubSpot Ground Floor Refresh

Project overview

Connect Install delivered a branded ground floor refresh in Dublin, including illuminated signage, wayfinding, window graphics, and a bespoke corten steel sign as part of an updated workplace environment. The project combined multiple visual elements within one programme and had to be delivered cleanly in a live office setting within a tight timeframe.

Client / project context

This project was delivered in a commercial workplace environment at a single Dublin site, supporting a wider visual refresh of the ground floor area. The works were time-sensitive and had to be completed in a live operational environment, with finish quality and coordination important to the overall handover.

Scope delivered

Connect Install delivered:

Survey support was provided by Focus Branding, with production coordinated between suppliers and Connect Install.

Key delivery challenges

The project had to be delivered within a live workplace environment and to a tight deadline, while coordinating different signage and graphic elements across the same refresh programme. Some installation points were physically awkward and more difficult to access, which increased the care needed to achieve a clean finish without affecting the surrounding environment.

How Connect Install approached it

Scope verification and survey support were led by Focus Branding, with Connect Install coordinating closely on planning, production, and installation delivery. The programme was organised to keep works controlled within the live environment, and closeout was managed through operations to maintain visibility and support a smooth handover.

Outcome

The refresh was completed on time and to a high standard, with all visual elements installed cleanly and with minimal disruption to the live office environment. The project delivered a stronger branded arrival and ground floor presence, achieved a clean handover, and resulted in strong feedback and repeat work.

Proof points

Why this case study matters

This project shows Connect Install’s ability to deliver mixed branded refresh scopes in live workplace environments where quality, coordination, and clean handover matter as much as speed.

Lidl Fridge Bay Graphics Rollout

Project overview

Connect Install delivered a nationwide graphics rollout across 96 Lidl stores in Ireland, updating promotional graphics and signage across poultry, meat, and fish fridge bays over a 6-week programme. The works were delivered overnight in live retail environments, with two stores completed per shift between store closing and reopening.

Client / project context

This was a multi-site grocery retail rollout delivered as part of a repeat programme. The work was highly time-sensitive, with each location needing to be completed within strict overnight access windows so that stores were fully ready for trading the following morning.

Scope delivered

Connect Install delivered:

The programme covered 96 locations nationwide.

Key delivery challenges

The main challenge was the delivery model itself: two stores per night, completed fully between closing and opening times. The team also had to work around other contractors carrying out shelf works on the same fridge bays, while in many stores water pressure cleaning had taken place, creating wet floor and substrate conditions that made graphic application more difficult. In some cases, missing supplied materials meant return visits had to be planned at the end of the programme.

How Connect Install approached it

Scope and survey information were provided at the outset, and Connect Install coordinated closely with the client’s operations team to plan the rollout store by store. Installation teams worked to a disciplined overnight schedule, with operations managing site changes, programme flow, and reporting. Daily closeout kept progress visible throughout the rollout and helped maintain control across all 96 locations.

Outcome

The rollout was delivered successfully across the programme, with strong consistency from store to store and works completed within the available overnight windows. Despite difficult site conditions, parallel contractor activity, and some missing materials, the programme maintained pace and finish quality throughout. The result was a clean seasonal refresh across the estate, strong client feedback, and repeat work.

Proof points

Why this case study matters

This project demonstrates Connect Install’s ability to deliver high-volume, time-sensitive rollout work across live retail environments where overnight access, coordination with other trades, and programme discipline are critical to success.